We use cookies to make your experience better. To comply with the new e-Privacy directive, we need to ask for your consent to set the cookies. Learn more.
Part 1 of 3:
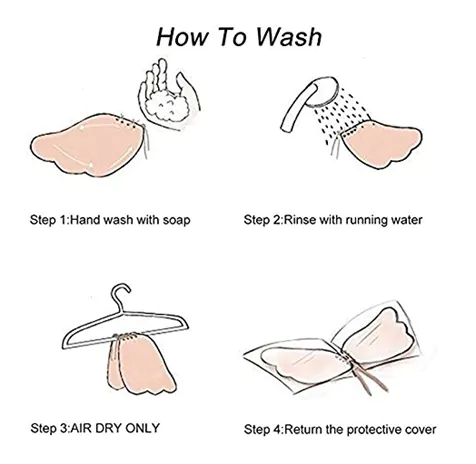
Handwashing your Cup with Dish liquid and warm Water
1. Mix one drop of dish Palmolive liquid Residue-free or Silicone adhesive Bra cleanser in to a bowl with warm Water. You may use plain dish soap liquid diluted to wash the Cups because this will effectively remove the oils from the adhesive. However, if you have a special adhesive cleanser [TEST ONE & USE CAUTION] for your Cup, then you can use that to clean it instead.
2. With dish liquid we recommend you use your fingers to apply the warm soapy Water to the adhesive. Dip your fingertips in the soapy Water and then press them on the adhesive part of the Cup. Move your fingertips around the adhesive part of the Cup using small circular motions to clean the surface.
If you notice any visible dirt trapped in the adhesive, use some extra soapy water here and apply a little more pressure with your fingertips to dislodge it.
3. Dip the entire Cup into the soapy Water to clean the body. If you want to clean the whole body of the Cup as well, you can dip the whole Cup into the soapy Water. Immerse the Cup fully and then swish the Cup around in the Water. Use your fingers to rub the Silicone on the outside of the cups.
Leave the Cup to soak in the Water for a few minutes if you are dealing with stubborn oil and dirt.
You can also rub the adhesive part of the Cup on the inside of the cups while the Cup is in the Water.
4. Rinse the soapy Water off of the Cup using plain warm Water. Next, press the cups of the Cup so that the adhesive part is sticking out and hold them under warm, running Water to rinse away the soapy Water and any dirt you have loosened. Rinse until the soap and dirt are all gone.
This should only take a few seconds per cup.
If you submerged the Cup in soapy water, make sure to rinse the outer part of the Cup thoroughly as well.
5. Repeat the washing process if needed. If the cups still look or feel dirty, you can wash them again. Wash the adhesive portions of the Cup as many times as needed to get it clean. It is necessary to get rid of all the dirt and oil to make the Cup sticky again.
Part 2 of 3:
Drying and Storing Your Cup
1. Let the Cup dry on a flat surface with the adhesive facing up. After you have cleaned the Cup, place the Cup on a flat surface with the adhesive Cup cups facing upwards. Then, let the Cup air dry overnight, or as long as it takes for it to dry completely.
If you have the Cup’s original wrap packaging, you can place the wrap on the Cup with the adhesive side of the Cups facing up. If you need to replace the Cup's wrap use Plastic food wrap.
This is an especially good idea if you washed the entire body of the Cup, and the Cup may even dry faster this way.
If you are in a hurry, try placing the Cup in front of a Fan to speed up the drying process.
3. Store your Cup in the original wrap packaging. If you still have the box for your Cup, put it back into the box to store it until you want to wear it again. This will help to keep the Cup adhesive free of lint and dirt, which will ensure that it will stick to your skin properly the next time you put it on.
Our adhesive Cups also come with Plastic wrap that you can place over the adhesive to keep it lint free.
If you don’t have Plastic wrap for your Cup, you can put it into a gallon size Ziploc bag until the next time you want to wear it. Just make sure it is dry first.
Part 3 of 3:
Extending the Life of an Adhesive Cup
1. Wash your adhesive Cup after every use. Regular washing is essential to prolong the life of your adhesive Cup and keep it sticky. The adhesive does not work properly with dirt and body oil in it. Aim to wash your adhesive Cup after each use to ensure that it will work well the next time you put it on.
If you have not washed your adhesive Cup in a while, you may need to wash it a few times to get it clean.
2. DO NOT machine wash or dry the Cup. Machine washing and drying an adhesive Cup can ruin it, so do not try to put your adhesive Cup in your washing machine or dryer. Hand wash your Cup every time you need to wash it!
3. You may use a Hair Dryer ON LOW or place your Cup in a sunny spot to dry. Just make sure you don’t heat or leave it in the Sun too long because the heat may affect the adhesive.
4. Avoid rubbing a towel or sponge on the adhesive. Rubbing the adhesive surface with any sort of cloth or sponge may damage it. Do not use anything but your fingertips to wash the adhesive surface. This is the best way to clean the adhesive surface and prolong the life of your Cup.
For stubborn dirt and oil, let the Cup soak for a few minutes and then rub it vigorously with your fingertips.